 Darefore Review – First experiences with cycling’s latest RIDE POSITION sensor
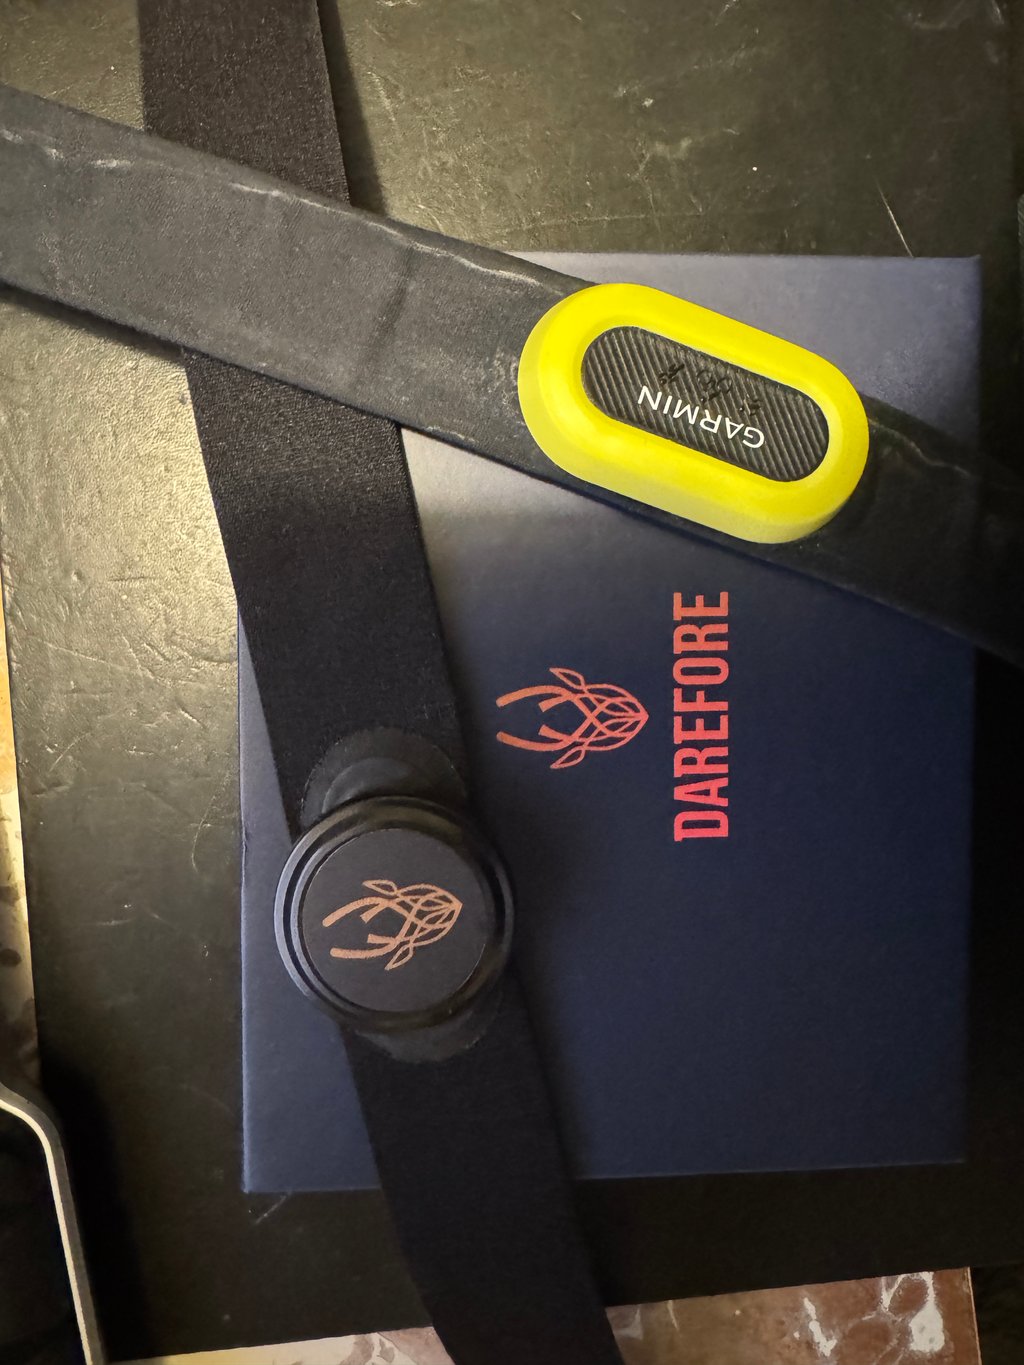
Darefore’s cycling position sensor is worn like a heart rate strap. It gives detailed insights into precise cycling position data on your Garmin in real time and afterwards in the Darefore ecosystem and Garmin Connect.
It’s a little bit expensive and a little bit niche. Still, suppose you are looking to dial in your cycling position – Darefore is a sensible way forward for those unwilling to go for a comprehensive but more expensive aero solution like Body Rocket.
What’s Measured?
The sensor measures the angle of your torso, accounting for road grade. HR is also measured. The following are calculated.
- Body angle
- Slope
- Body angle adjusted to slope
- CdA
How does it integrate into your Cycling Ecosystem?
It can replace your heart rate monitor or work alongside your current one. Data can be captured on Darefore’s smartphone app or CIQ app on your Garmin device.
In my mind, this is the correct way to work. I’ve seen many 3rd party tools that assume they are more important than your current use of Garmin. Not Darefore. It adds to how you already consume cycling data, you don’t have to make any changes… simply ride and enjoy the new insights. There are a few caveats, but I’m happy with the approach.
How do you use it
This fooled me for one ride.
It’s a heart rate strap that you wear backwards. i.e. with the sensor pod on your back. You can get away with wearing another chest strap simultaneously, which I did.
It all works if you wear the pod on the front, but your numbers move incorrectly as your body position changes. Don’t do that.
How is Darefore setup, Setup problems, and calibration
This was a bit tricky for me as there were some authentication delays linking the Darefore CIQ app. The pairing process is similar to other sensors that link to Garmin CIQ apps, and you only have to do this once.
- Open the Darefore app on your smartphone. Do the usual account setup. You MUST also create a bike and accurately complete the weight settings for you and the bike.
- Link your Darefore account with your Garmin Connect account on the Darefore smartphone app.
- Copy the unique 32-digit code from the Darefore app
- Install the Darefore Connect IQ (CIQ) data field on your Garmin device. Open to its settings page in Garmin’s Connect IQ smartphone app (don’t use Garmin Express)
- Paste the 32-digit code into the CIQ app settings.
- Sync everything, everywhere, a couple of times.
- Double-check that the 32-digit code appears in the CIQ settings in Garmin Express.
On your Garmin Edge device…I used a Forerunner 965
- Do not pair the chest strap to your device..ever. It is not a regular heart rate monitor/sensor.
- Add the Darefore CIQ app to one of the profiles. I added it as a one-metric screen so the CIQ app filled it completely. The Stryd Zones developer writes the app, so it’s a good one.
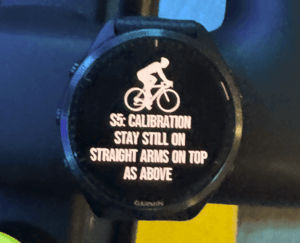
Now, all you have to do is calibrate the sensor for every ride
- Open the sport’s profile and navigate to the data field.
- The data field initially tells you it is looking for the pod. this might take 20-60 seconds
- When the data field has found the pod, start cycling with straight arms on the hoods.
- As soon as you are comfortable, start recording your workout
- 3 seconds later, the calibration should be complete. You’re good to go.
- The screen will change to a colourful display with dials and lots of bits of data, some of which you can configure to your taste in the Connect IQ app/Garmin Express. You can page away from here, and the data will be captured as you ride using your regular screens.
Problems:
I encountered and mostly resolved two issues,
- Getting the 32-digit code to authenticate took a few tries
- The data field takes a while to pair to the sensor. I believe this is due to Garmin assigning low pairing priority to CIQ sensors. The whole thing might be much quicker if you have fewer ANT+/BLE sensors paired in your sensor pool than I do. (CIQ 8.1 may change this)
Some Tests, Some Data with commentary
These rides and charts explain how to use or check the positional data. I didn’t explicitly set out to verify Darefore’s accuracy.
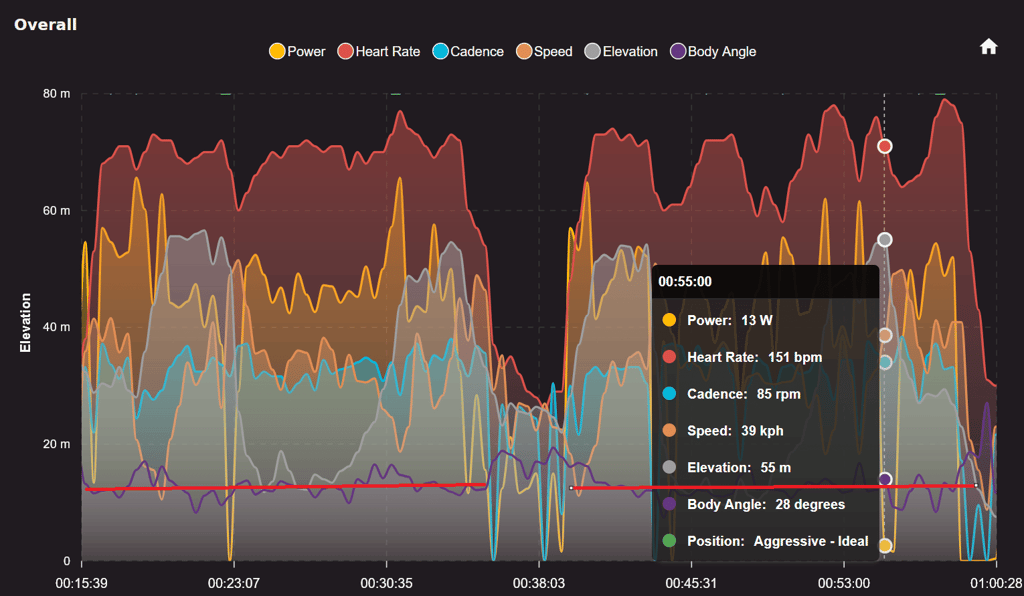
Easy, Flat Group Ride; quite a lot of drafting, quite a bit of stopping at lights
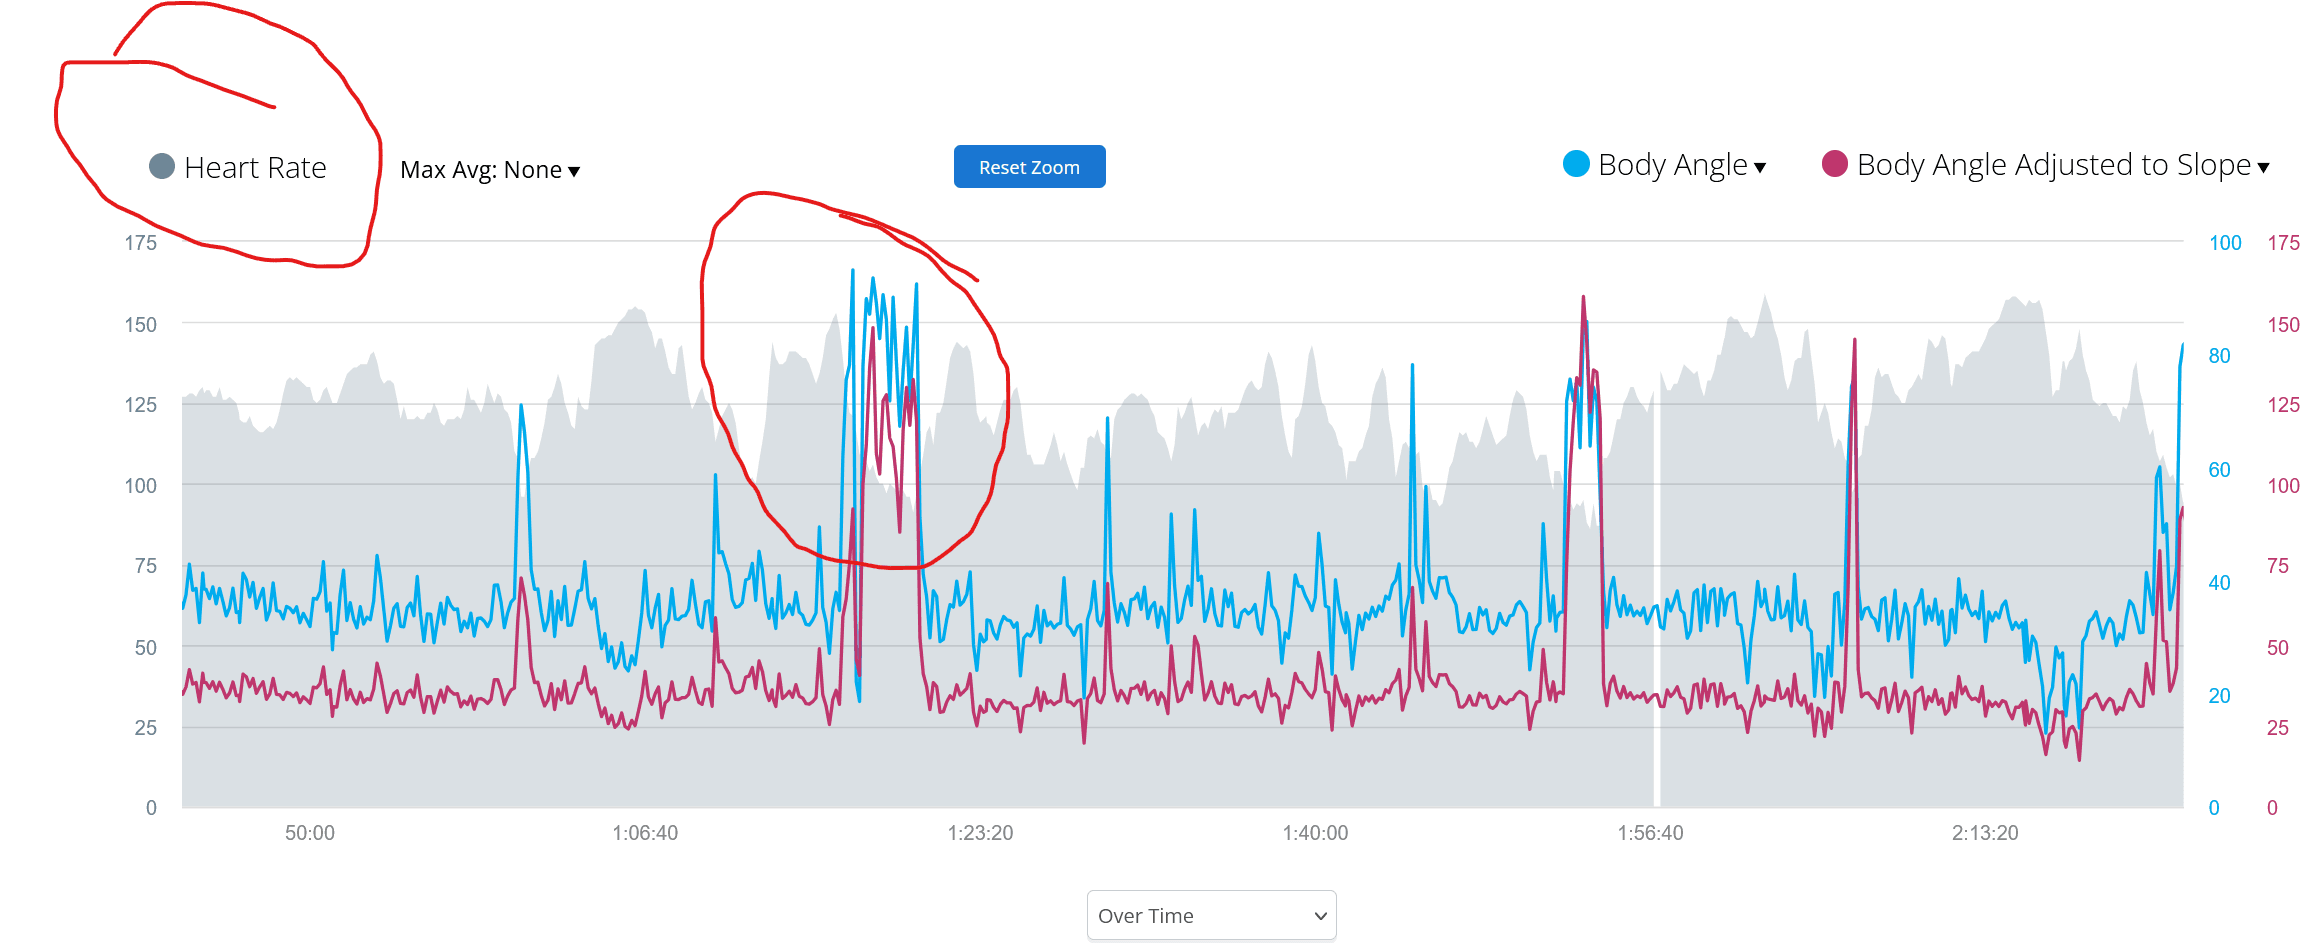
Darefore’s sensor contains an Inertial Measurement Unit (IMU-gyroscope, plus a few bits) to measure its angle constantly and, hence, your body angle. However, riding on a slope with an unchanged position would give incorrect data. A Garmin CIQ data field can’t get elevation data from the watch/Edge, so Darefore also determines the slope and removes its effect from the body angle.
Toward the end of the ride section, represented by this graph from Garmin Connect, you can see a downhill section where the adjusted body angle appears less steep (correct) than the raw, unadjusted angle.
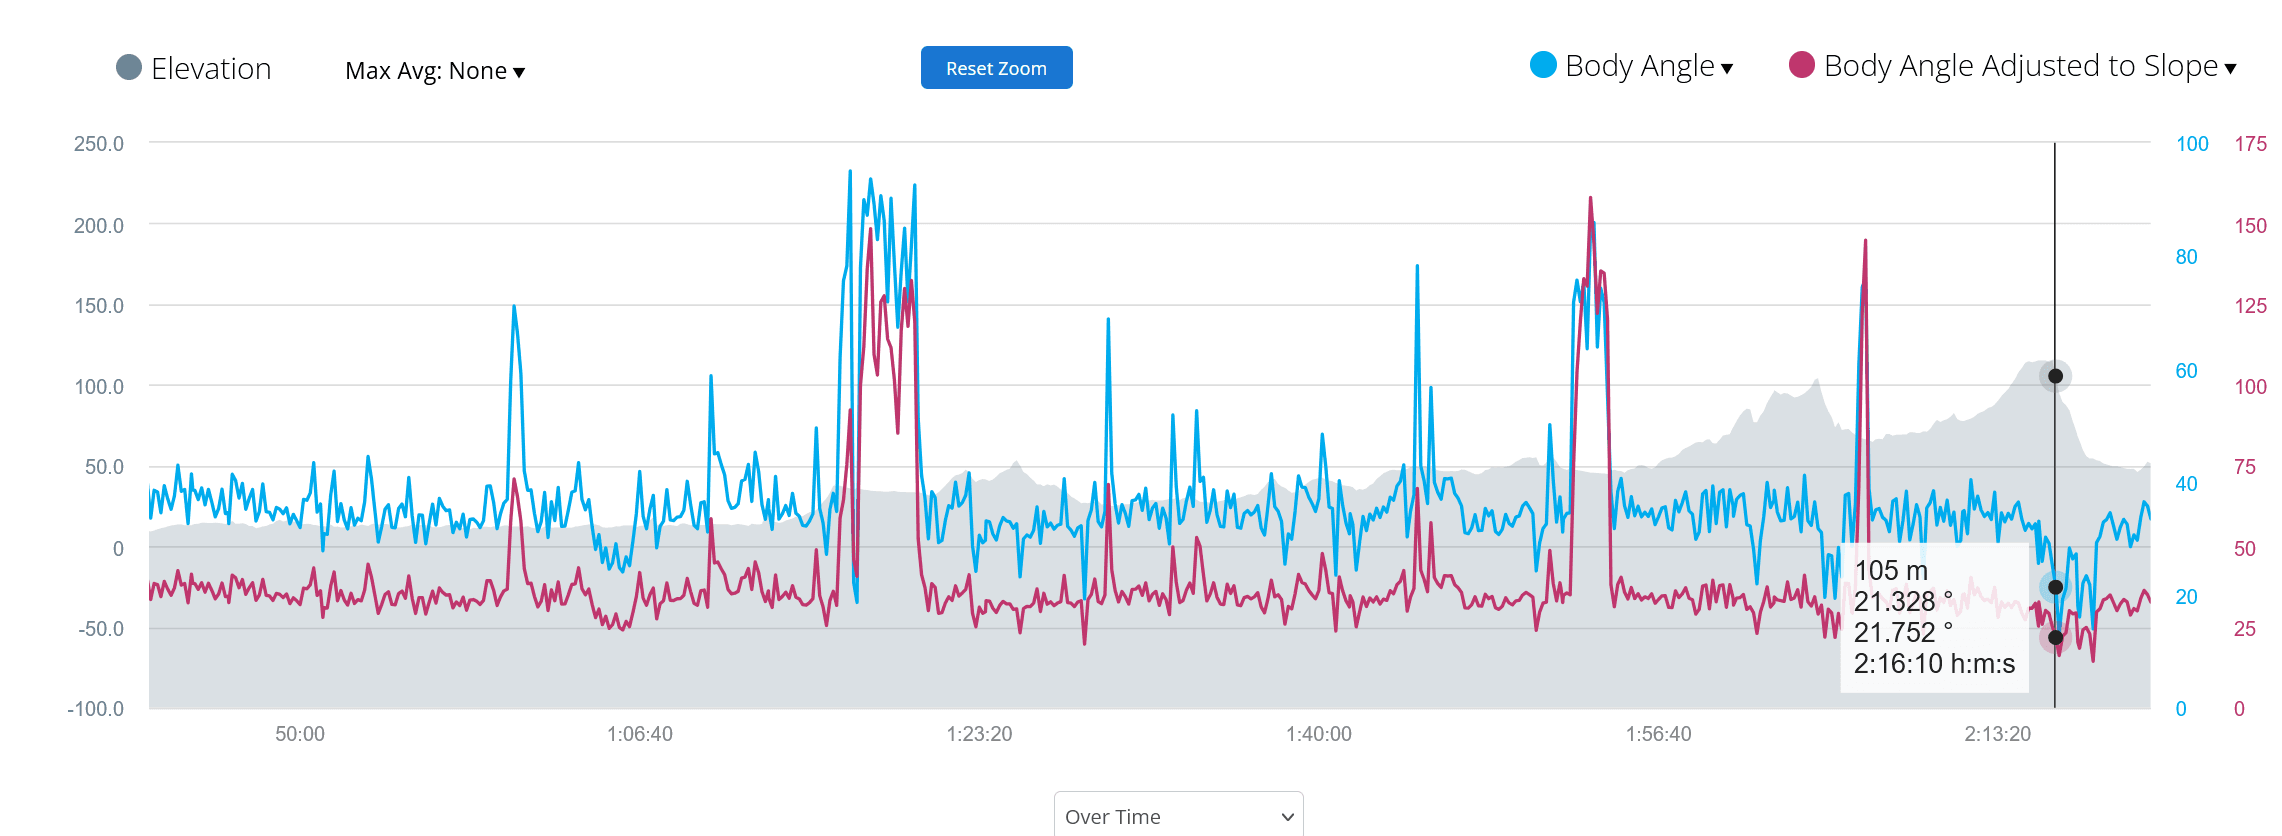
The prominent peaks in the data, for example, around 1:10:00, probably represent a standing position at stops for cars, traffic lights and queues.
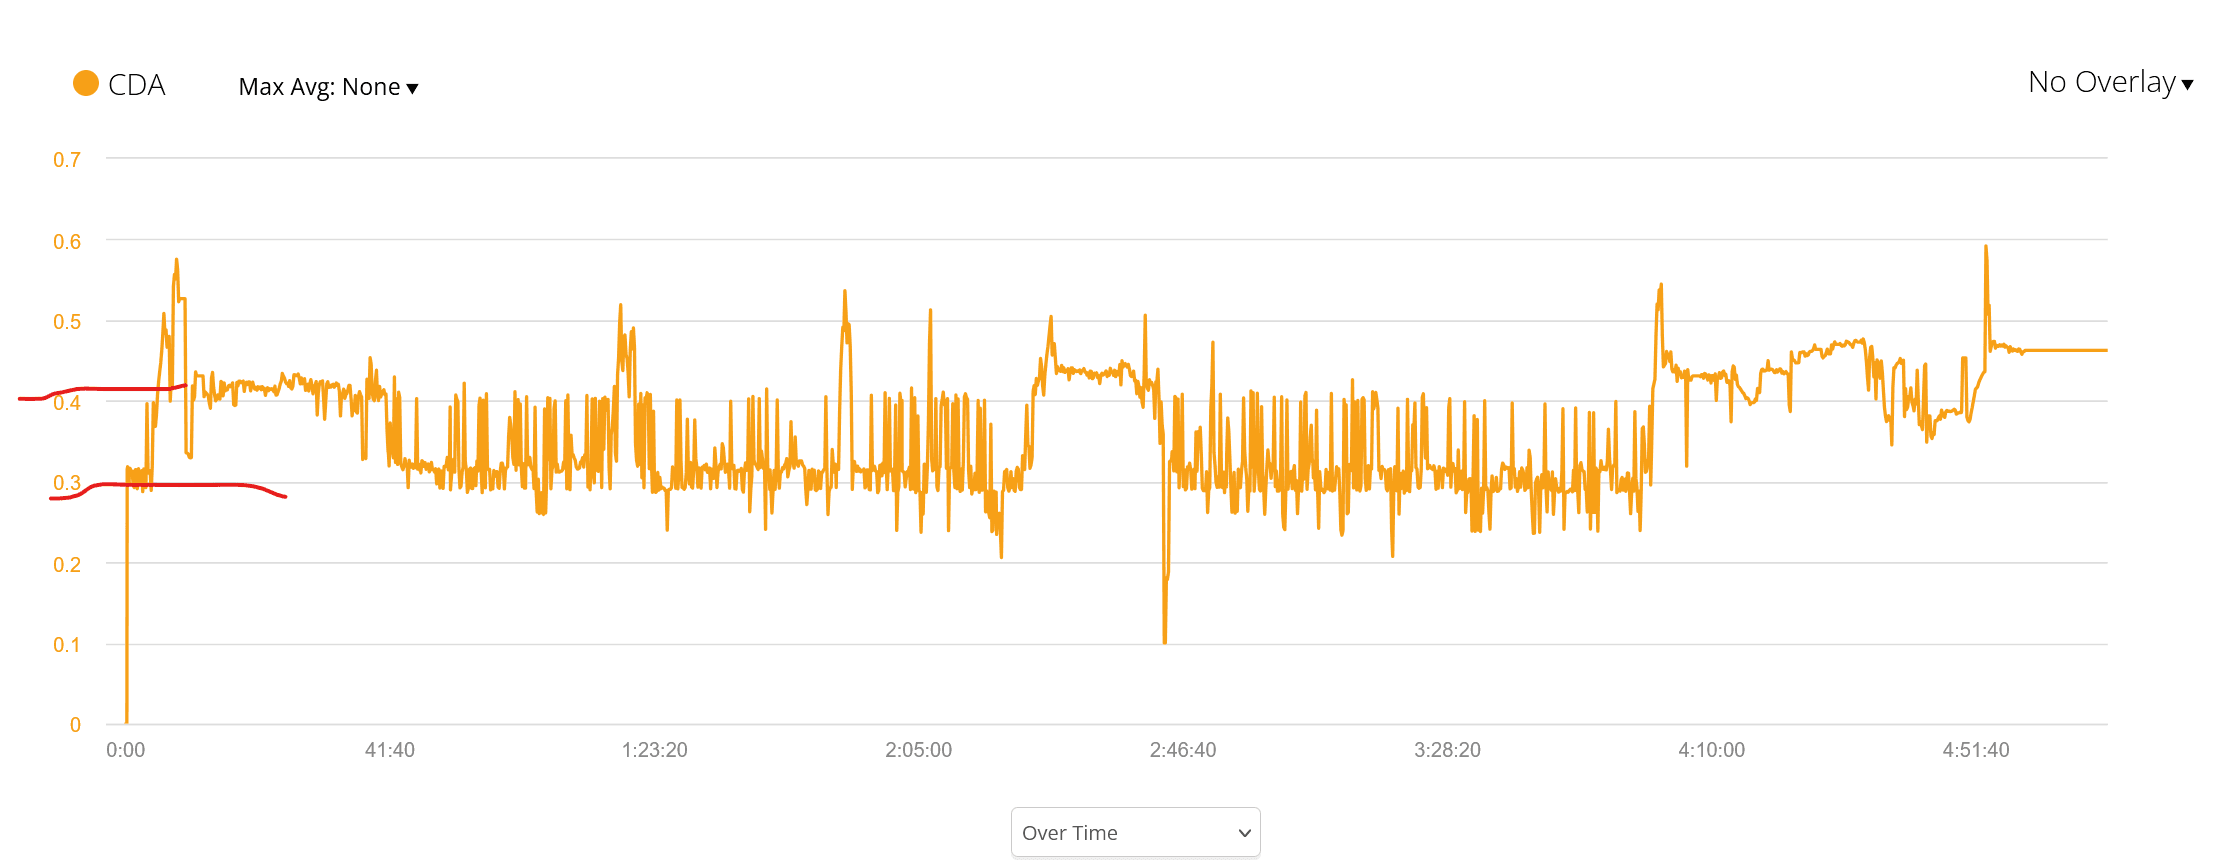
Other data recorded includes an estimate of CdA. I don’t know my CdA on this ride on a road bike; it might be 0.35-0.5. A pro racer in the summer, could see a lower figure of 0.3, even lower in a TT position.
I used an accurate power meter, the correct setting for my weight, and a reasonable estimate for my bike weight. The math determines a reasonable CdA estimate. The value fluctuates between 0.3 and 0.4; considering there was a lot of drafting, this is what I would expect.
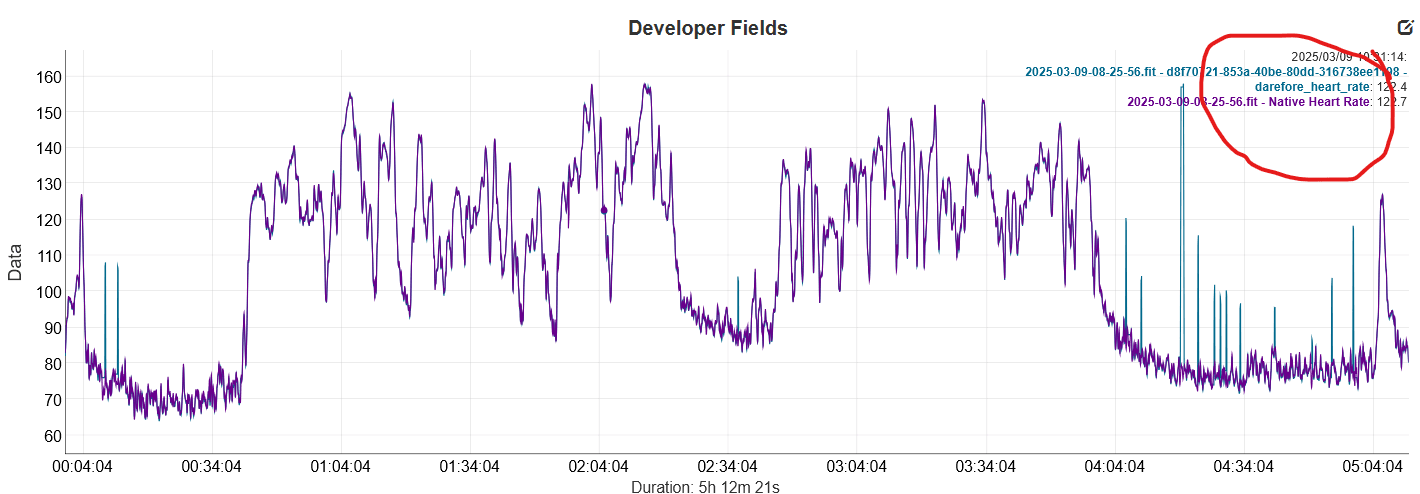
Finally, look at the native heart rate recorded for the Garmin HRM-PRO+ vs HR according to Darefore, shown in dcrainmaker’s Analyzer tool. Apart from some incorrect spikes, perhaps caused by wearing two chest straps, the manufacturer’s claim of 99% accuracy might be good.
That sums up all the main bits of raw data from one ride. It looks plausible.
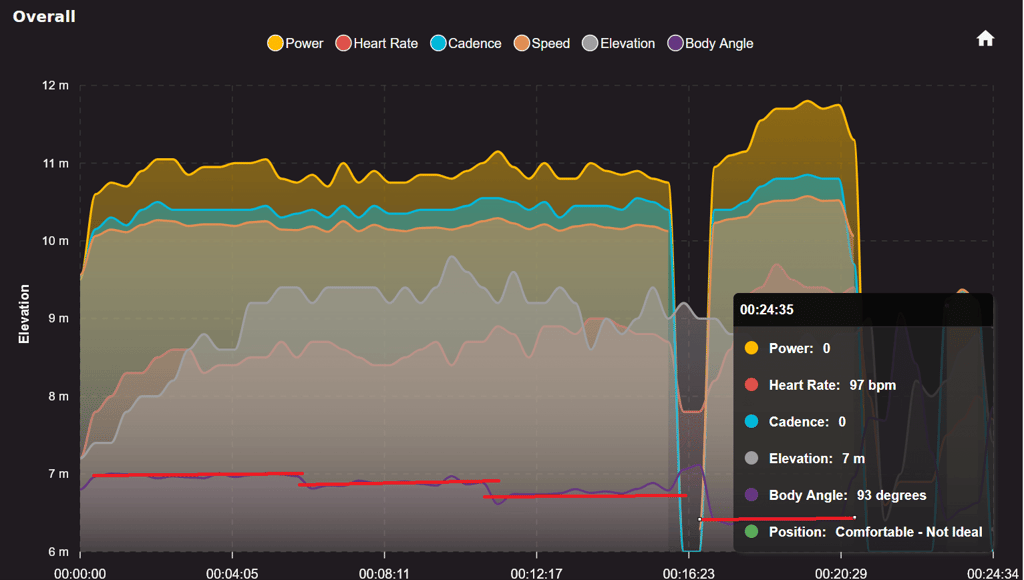
Indoor Threshold(ish) Effort
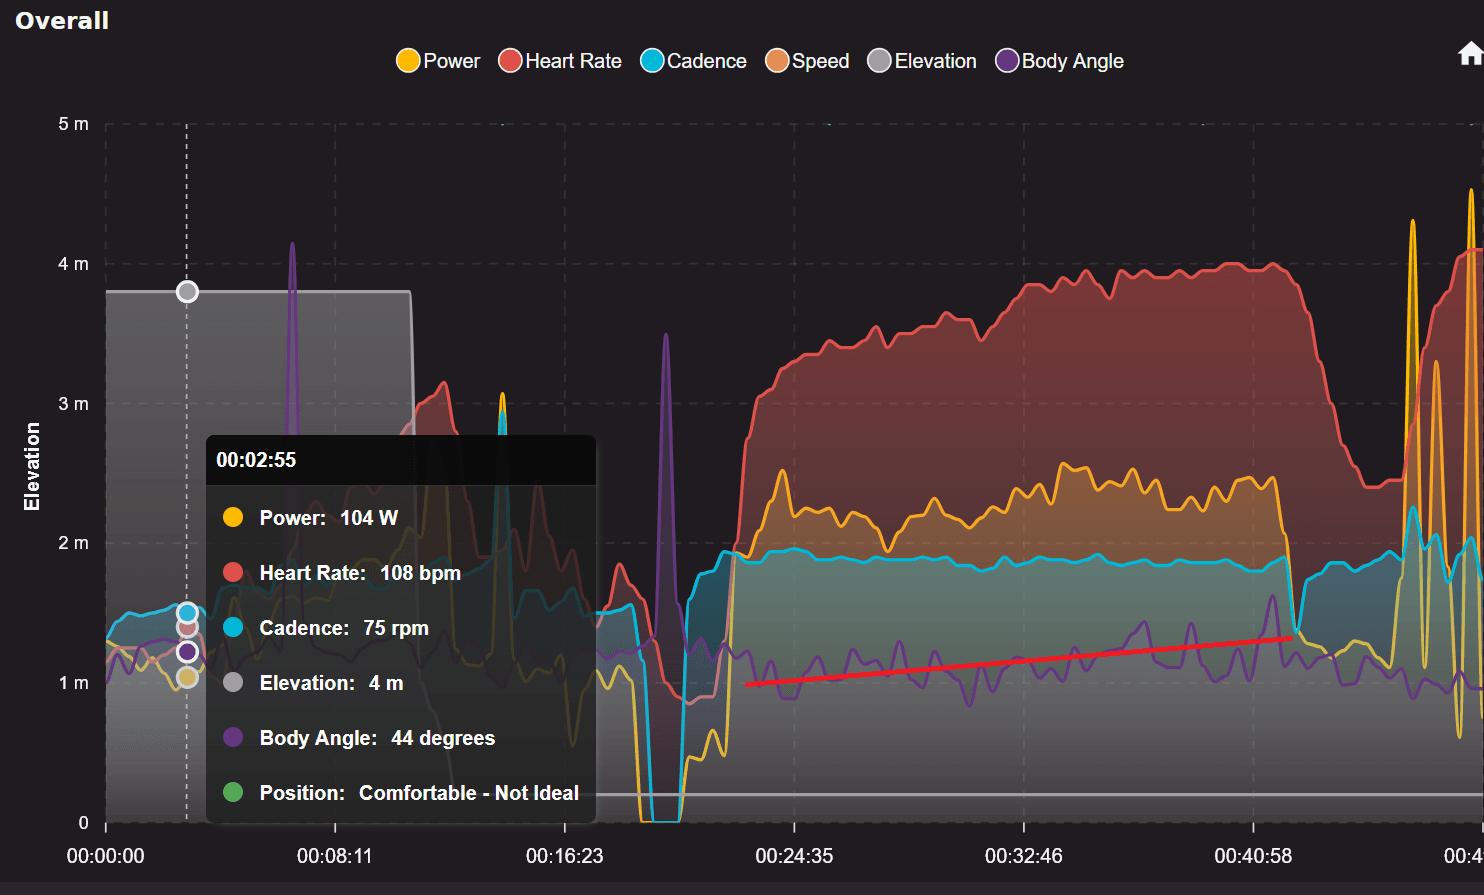
This indoor ride shows a relatively steady but increasing power/HR effort for 20 minutes. As my heart rate rises and I struggle a bit, my body position appears to become more upright.
I was testing a power meter and wasn’t especially trying to show body position. Still, this illustrates how you might want to examine the relationship between body position and effort. There’s little point in trying harder on the road if your body position becomes less aero with increased drag, sapping away the extra power.
2x 20ish Threshold Outdoor, Some traffic
I was pretty pleased with this 2×20, trying to replicate race-like conditions. I seemed to manage a consistent position on a slightly new bike setup.
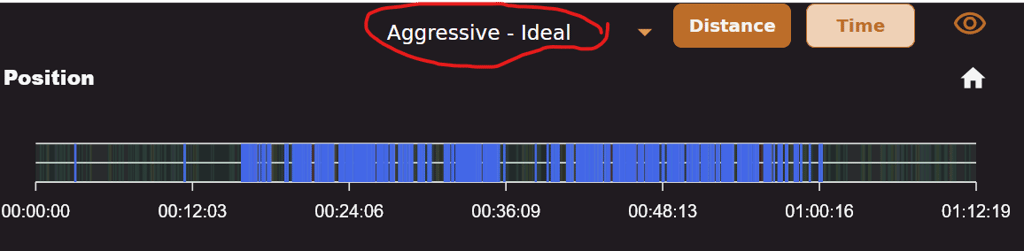
The Darefore online HUB has some interesting analyses. This first chart shows the variation in my ride position throughout the entire ride.

I filtered out the positions to show only my Aggressive=Ideal performance, which seems to tie nicely to the two twenty-minute periods of effort. Cool! Despite that, my power and road speed were about 5% lower than hoped, which was probably due to traffic.
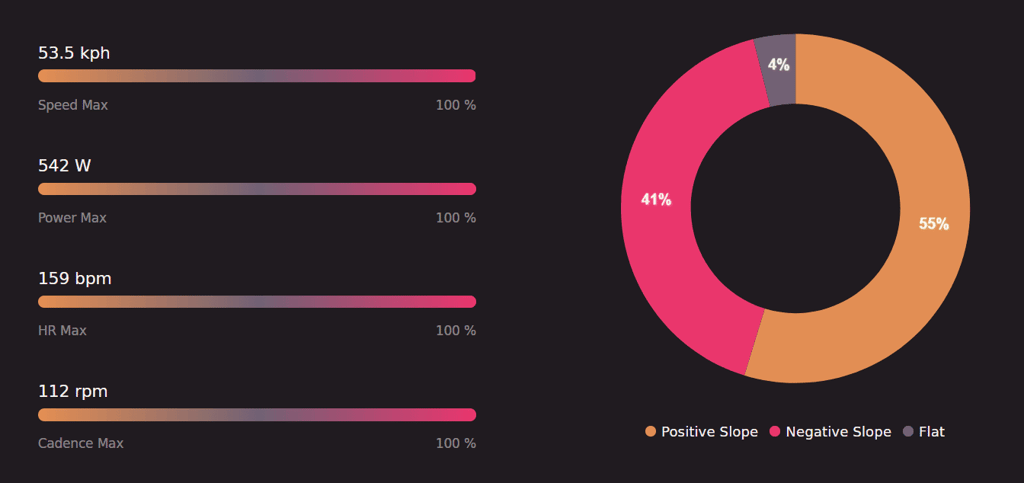
Many other analyses, including this one, are linked to power, speed, and position. This one has a doughnut. Everyone loves doughnuts. Or at least they should.
Technogym Spin Bike
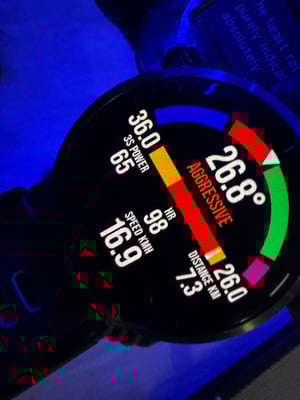
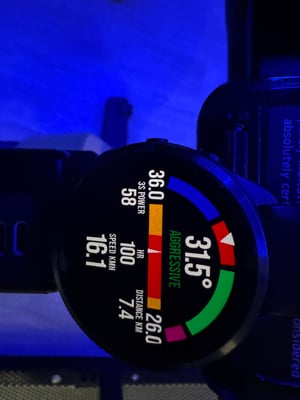
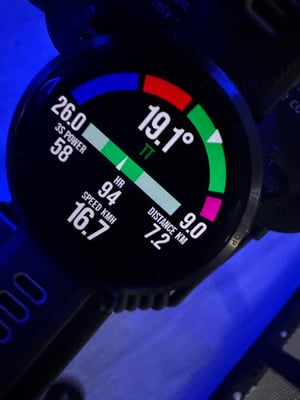
This chart is from a Darefore test where I used a Technogym spin bike at my gym. I maxed out my seat height and slammed the bars as low as they would go. It was just about rideable. The point of this test was that it was in a controlled environment, and I was only exerting minimal power (100w, something like that). But I was steadfastly holding a position for 4 minutes, then repeatedly changing and holding a new position. I went from bars to hoods, to aggressive hoods, to a TT bar position. You can see that Darefore tracked these changes extremely clearly.#NiceJob.
I also took photos of the Garmin CIQ data field from the same session, categorising my position correctly (Aggressive vs TT). You can also see the four torso angle ranges on the dial corresponding to four broad positions from regular ‘blue’ to green ‘TT’, with the pink region probably being too extreme to generate power.
This is yet another chart based on the same session – time in position zone – don’t read too much into the data.
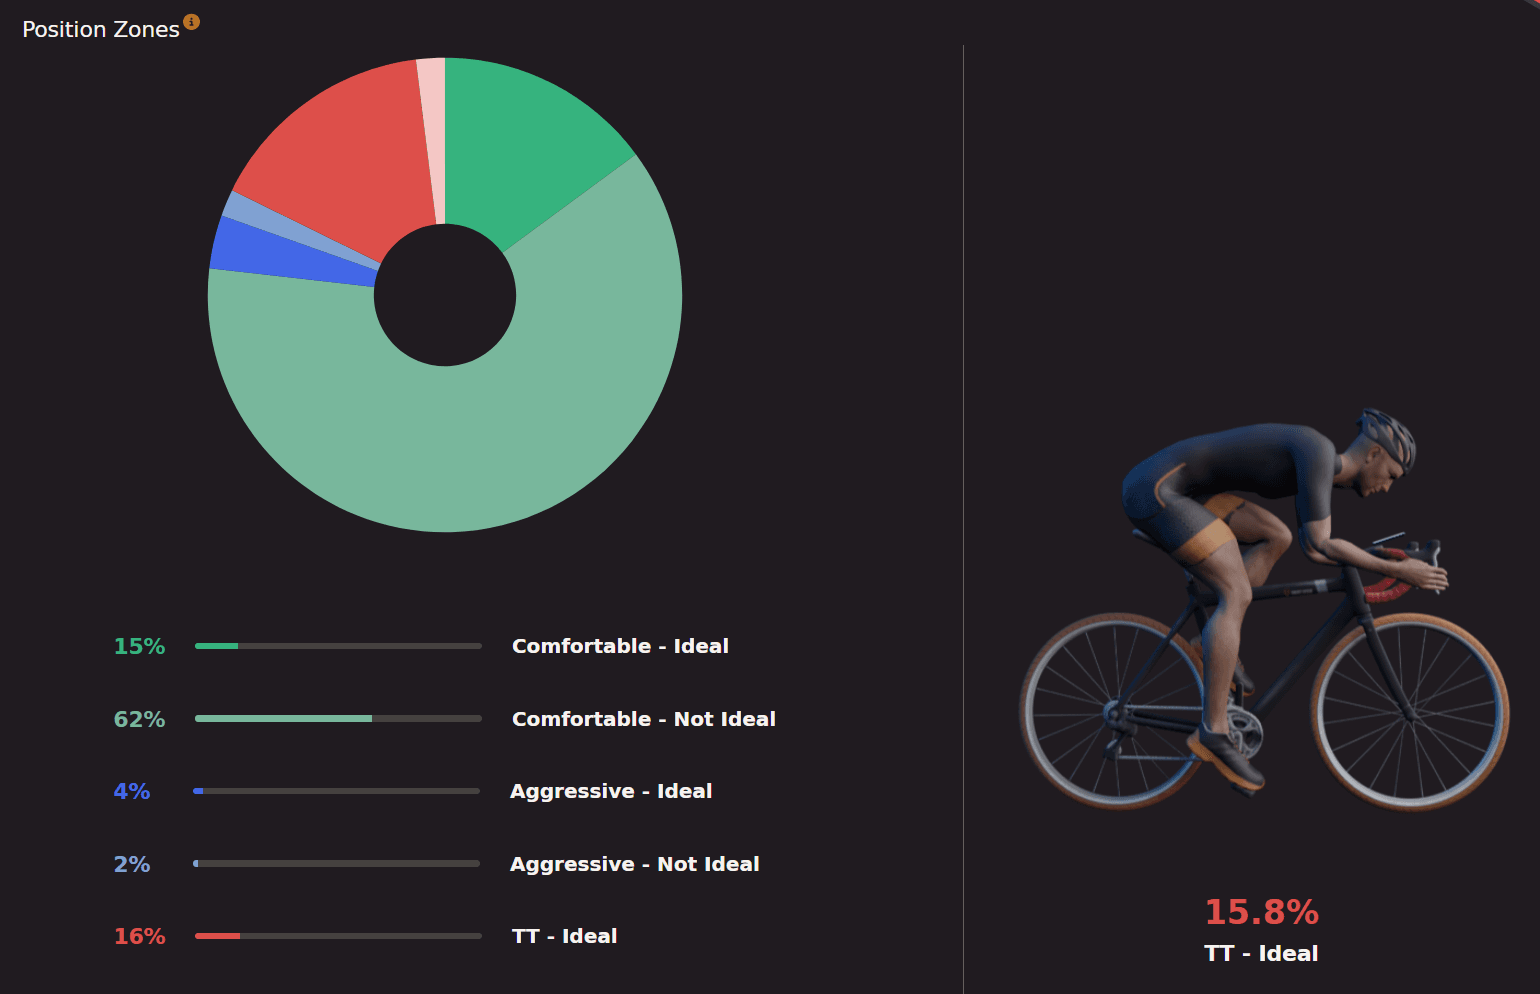
and another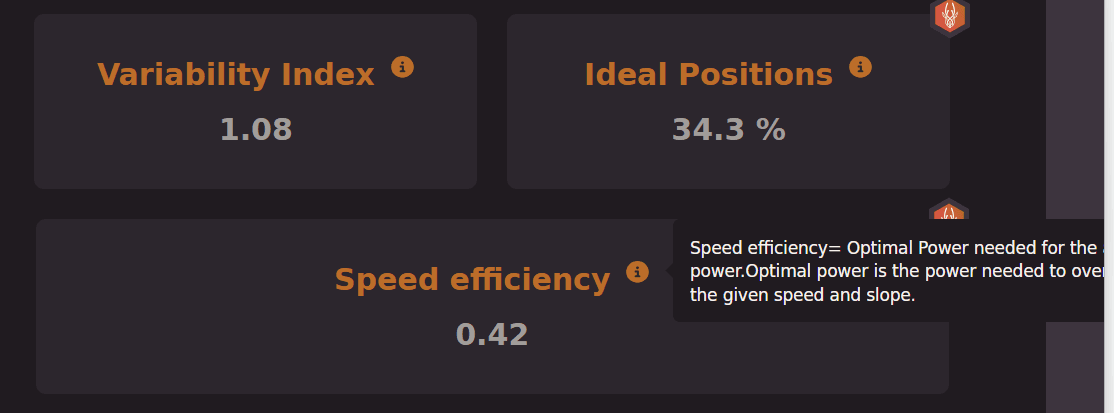
Other Analyses
The online hub duplicates much of what I have elsewhere regarding analysing speed and power. What it adds is the positional information. There are various positional trend charts and personal bests – like this:

Alternative products
The only similar product I’ve looked at is Streamlines FORMA, which uses laser measurement from the bike’s stem to your chest. Although measured on the other side of the torso to Darefore, the data is probably equally as meaningful. Still, Darefore’s app and online hub are better than FORMA – which, to be fair, perhaps has improved in the 18 months since I looked at it.
Data Issues and Other Comments
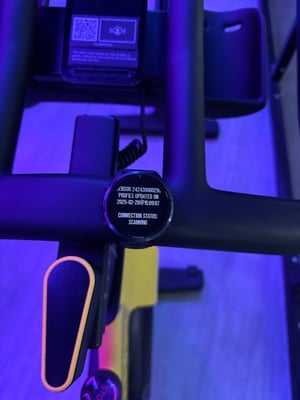
The hardware is based on the MOVESENSE platform. It is a Suunto heart rate monitor with special internal sensors spun off from the company several years ago. It’s used for a wide variety of one-off sporting applications.
I was concerned about the method of data capture and its implications
- The pod is on your back. Will the Bluetooth signal travel around your body to the watch or Garmin head unit without data loss? A: It worked going to my wrist; maybe it would be different with a stem-mounted Garmin Edge, but I didn’t test that.
- Darefore’s data, including HR, is stored in a developer data field. Your watch/Edge will also store your standard heart rate and elevation as normal from your regular source. This made comparing the two sets of HR data easy for me, but you might find issues getting the developer data into your software of choice. Hopefully, that won’t be a big deal for you, it wasn’t for me.
- I briefly looked at the CIQ slope data vs the Garmin elevation (and hence slope) data. I wasn’t convinced they matched, but I could be wrong.
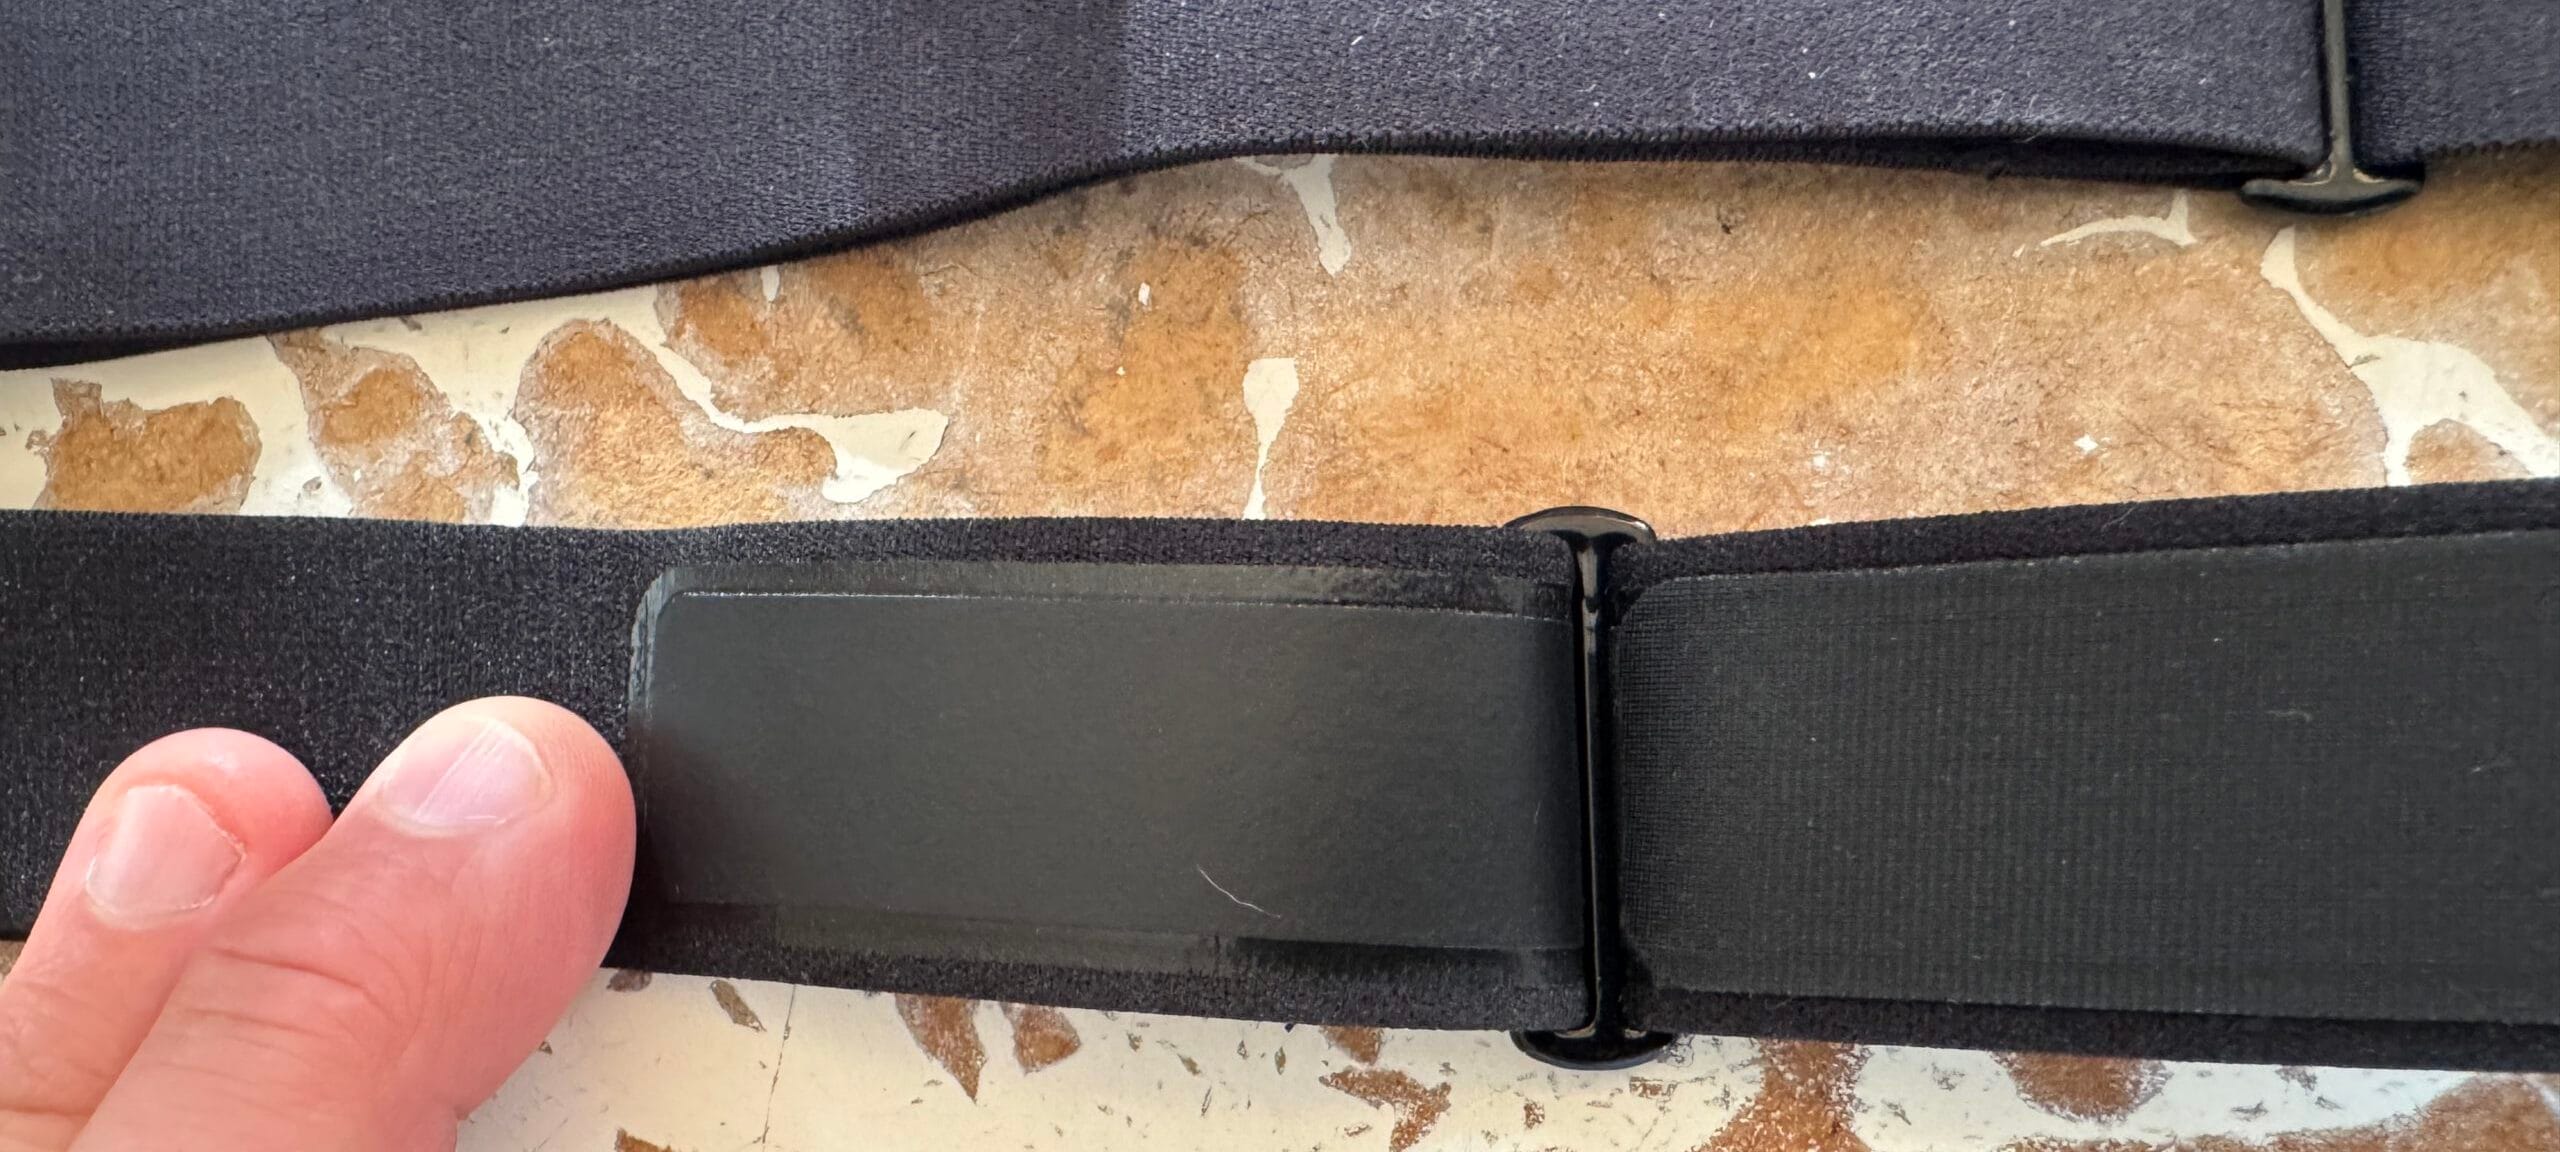
- As the strap is worn 180 degrees from normal, how will the sensing pads pick up heart rate? A: It’s a custom strap with extended sensing pads extending to the body’s front to collect HR data in the usual location. This seems to work surprisingly well. The only issue was that the sensing pads were long and slightly thick, and I had to thread them through the strap-shortening mechanism. All seemed good, tho – see image below.
The sensor ecosystem was interesting and raised some possible other uses
- As the pod is small and worn to the rear, this might make the strap more comfortable to use for some women
- The torso angle is produced regardless of whether or not you are cycling. This could be combined with data from Stryd or Garmin’s running dynamics. Admittedly, it’s a potentially new bit of data with super-niche uses for measuring running torso angle.
Take Out
Looking at the job at hand, Darefore seems to do well. The sensor is easy to use, and the data seems meaningful based on my limited time.
The setup was a tad harder than I expected, but that was more than compensated for by the excellence of the CIQ app once it started working and the seemingly comprehensive nature of the app and online platform.
Looking at the product and how it fits the market raises the broader question: “Is there a market for it?”. The demand for full-blown aero sensing products is highly niche, and products like Darefore are a lower-priced, cut-down version of those. Maybe the lower price will find a larger market, the reduced feature set will lose part of the potential market, and maybe the uniqueness of the data will appeal to enough people to make this viable.
I think Darefore may be similar to the running gait products; new ones appear each year but never find the right niche. i.e., Darefore is a nice, well-executed idea, perhaps trying to find a market that isn’t there.
Having dabbled with aero positioning in the past with STREAMLINES and AEROPOD, I suspect I wouldn’t use this product category very much in the future. But if you want to measure torso angle, your riding positions, and their effects in more detail, this is a relatively low-cost way to get started. I’ve only spent a few weeks using the data on and off. I don’t know it well enough to recommend it as correct – but it looks good and could be worth a shot.
Buy One: darefore.com (unaffiliated) or amazon.com.
Last Updated on 29 January 2026 by the5krunner
My favourite kit and nutrition
- Injinji – Runners protect your toes. Avoid discomfort and minor injury. Run more. Run faster. I use them.
- Garmin 90-degree charging adapter — The small adapter that keeps your charging cables tidy. Essential for race day. I use one.
- Garmin charging puck — the fastest and most reliable way to top up your Garmin before a session. I use one.
- Ravemen FR300 — Front light that mounts directly under your Garmin or Wahoo head unit. Keeps your bars clean and your beam pointed where it matters. I use one.
- Body Glide – The blue anti-chafe stick that all swimmers and many runners use. I use it.
- Maurten — The race nutrition trusted by elite athletes. Gels and drink mixes engineered to be easy on the stomach. I use them.
- Garmin Varia RTL515 — A radar rear light that alerts you to vehicles approaching from behind. Pairs with your Edge or Garmin watch. I use this model.
- Favero Assioma Pro RS2 — The power-meter pedals most serious cyclists choose. Accurate, easy to move between bikes. I use this model.
- Garmin Forerunner 970 — A serious choice for a pro-grade triathlon watch. I use this.
- Polar H10 — My daily driver for accurate, waking HRV readings.
- Wahoo ELEMNT Roam 3 — The bike computer that has the feature Garmin lacks: usability. I use mine on most rides.
Reader-Powered Content

This content is not sponsored. It’s mostly me behind the labour of love, which is this site, and I appreciate everyone who supports it.
Support the site: Follow (free, fewer ads) · Subscribe (paid, ad-free) · Buy Me A Coffee ❤️
All articles are written by real people, fact-checked, and verified for originality. See the Editorial Policy. FTC: Affiliate Disclosure — some links pay commission. As an Amazon Associate, I earn from qualifying purchases.

tfk is the founder and author of the5krunner, an independent endurance sports technology publication. With 20 years of hands-on testing of GPS watches and wearables, and competing in triathlons at an international age-group level, tfk provides in-depth expert analysis of fitness technology for serious athletes and endurance sport competitors. ID

The market for these services is trying to be acquired by someone with cycling ecosystem I guess, like Garmin, wahoo or hammerhead/sram to be incorporated in their tech. This seems way too niche and would end up like dozens of niche platforms that disappear after a few years otherwise.
I suppose that could be an exit strategy the owners hope for but i suspect the reality will be harder. I would have thought that Garmin, for example, could develop the hardware for this easily. They wouldn’t want the app platfrom as they would want to expand conenct.
runscribe was an interesting running gait product – they ultimately became a B2B sensor supporting physio/run labs
stryd is also interesting having created a complete ecosystem around a patented pod. I struggle to see their exit strategy too. But the market for running power is big comapred to bike aerodynamics – hence Stryd seem financially strong after several years, also i suspect Darefore don’t have patents.
several of the bike aero product seem to have drifted towards supporting coaching services.
I see darefore have started marketing/pre release registration for a runners version of their pod.
I doubt it’ll offer me much more than the overwhelming Garmin running dynamics data I get from my chest step already, but as a tech and data nerd, I’m interested…
Anyone seen any testing/reviews or have insight into the new product?